ID Badge Print Technology:

Objective: Establish the print method and production configuration that govern all subsequent badge design decisions.

  • Confirm direct-to-card or reverse-transfer dye-sublimation printing.
  • Identify the printer model and applicable 300- or 600-DPI resolution.
  • Verify single-sided or duplex printing and required production features.
  • Apply the approved printer configuration throughout the remaining design steps.

Critical warning: Do not approve a design until the printer and production configuration are confirmed.

EBS Knowledge Base—Learn More: PVC Badge Printer Technical Design Parameters Overview
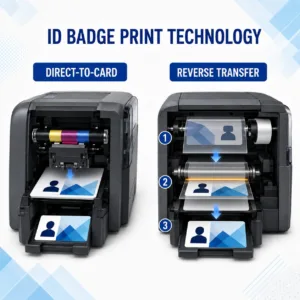
Comparison of direct-to-card and reverse-transfer ID badge printing technology

I need help describing our ID badge printing needs to eXpress badging®.

AI Prompt Primer: Replace this example with your exact needs:

We need a logo, badge photograph, full name, and department printed on the front. We expect to produce approximately ### badges initially and  ### afterward. We do not know which printing technology or production configuration is appropriate. Single-sided or duplex, why? Large names? Large Logo? Backside printing? Level of print quality? Design that bleeds off the edge?  Barcodes? RFID? I am not aware of the ramifications and how the selected technology affects the overall printing.

Ask focused questions about information still needed to define the printing method and production configuration.

ID Card Materials

Objective: Confirm the card stock, size, and required features before approving the badge design.

  • Select standard white 100% PVC or 60% PVC/40% polyester composite card stock.
  • Confirm standard CR80 size, 3.375″ × 2.125″, or identify a custom size.
  • Identify required embedded technology, magnetic stripe, adhesive backing, or specialty features.
  • Account for possible white-shade variation among materials, batches, and future orders.
  • Verify the material against the approved printing and finishing configuration.

Critical warning: Non-CR80 cards are custom, cannot be used in standard PVC card printers, and may require additional production time and cost. Personalization requires factory-personalization services, a separate production process not covered in this section..

EBS Knowledge Base—Learn More: PVC Badge Printer Technical Design Parameters Overview
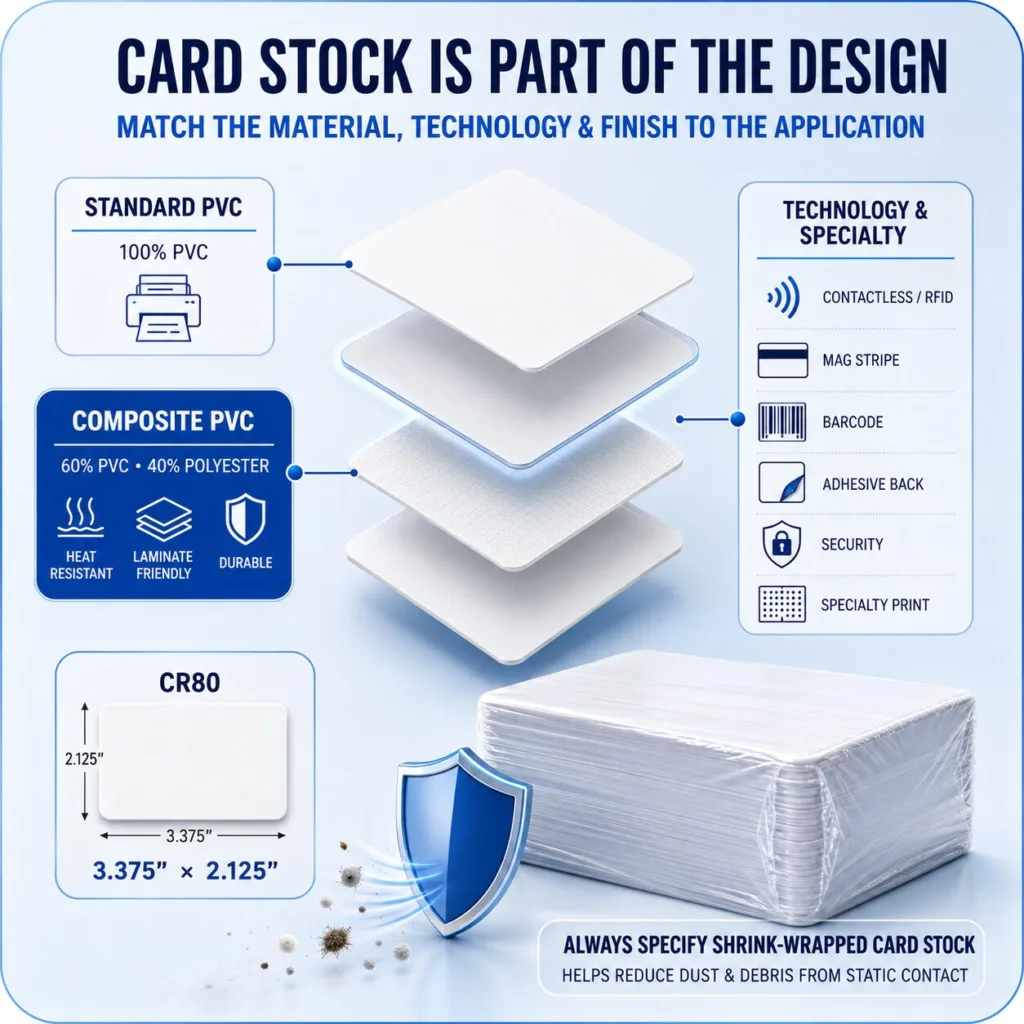
Comparison of standard PVC, composite PVC, and specialty ID card materials with shrink-wrapped card stock

I need help describing the card material requirements for our ID badge project.

AI Prompt Primer: Replace this example with your exact needs:

We need a standard wallet-sized ID badge, the same as a credit card. We do not know whether to use 100% PVC or composite card stock. The badge may also require these cardstock features: RFID, barcode, slot punched, or lamination, but not sure yet.  Does it matter?

Ask focused questions about information still needed to define the printing method and production configuration.

RFID Card Design, Printing, and Lamination

Objective: Confirm RFID card, design, printing, and lamination compatibility before approval.

  • Obtain the card manufacturer’s current specifications and antenna diagram.
  • Identify chip, antenna, and uneven surface areas.
  • Position photos, names, logos, barcodes, and small text away from restricted areas.
  • Confirm compatibility among the card, approved printing method, ribbon, and laminate.

Critical warning: Never infer an antenna location from another card model.

EBS Knowledge Base—Learn More: PVC Badge Printer Technical Design Parameters Overview
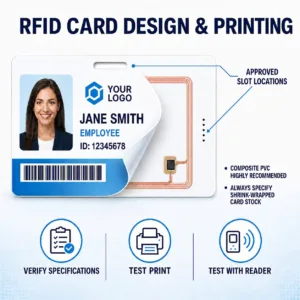
RFID badge showing an offset antenna and approved long- and short-edge slot locations

I need help describing the RFID card design, printing, and lamination requirements for our ID badge project.

AI Prompt Primer: Replace this example with your exact needs:

Our badges must work with an existing RFID reader system. The card manufacturer is UNKNOWN, and the cardstock product ID is UNKNOWN. What is the best way to determine the card manufacturer and product ID? We will need the completed badges by STATED DATE. We plan to have the photo ID badges printed on compatible cardstock.  We may require lamination and slot punching, but these requirements have not been confirmed. What questions should we be asking?

Ask focused questions about the card specifications: whether and where they can be slot-punched; whether the stock is compatible with the printers being used; and how durable the cards are without lamination and with lamination.

Artwork Specifications

  • Objective: Prepare complete, current, production-ready artwork for creation of the badge template.

    • Obtain original source artwork and applicable brand standards.
    • Separate fixed background artwork from photographs, names, identification numbers, barcodes, and other variable content.
    • Provide conditional graphics as individual files.
    • Prepare artwork in RGB at its intended dimensions and required resolution.
    • Preserve original proportions and supply editable or layered files when elements must be separated.

    Critical warning: Low-quality, flattened, or incomplete artwork may require approved professional artwork services before use.

    EBS Knowledge Base—Learn More: PVC Badge Printer Technical Design Parameters Overview
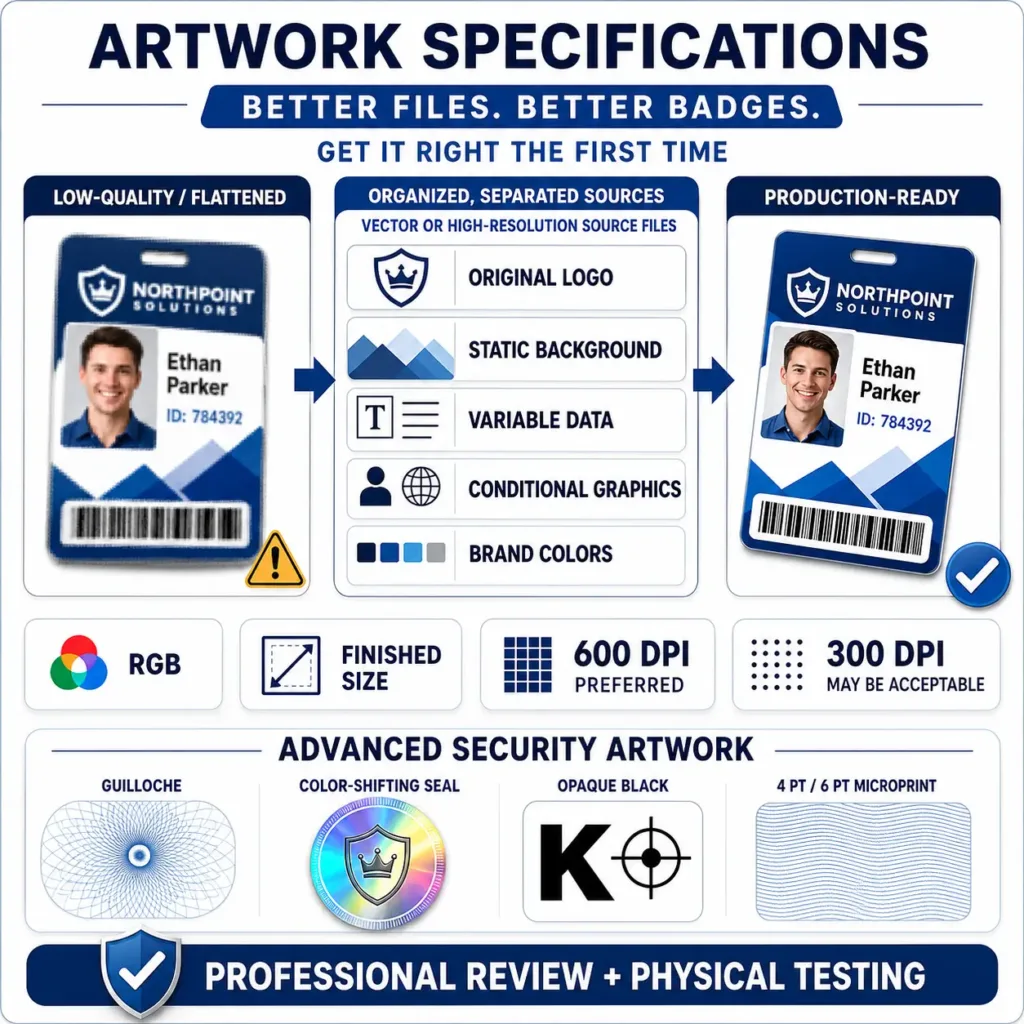
Infographic comparing low-quality flattened badge artwork with organized, production-ready artwork

I need help identifying whether the artwork for our ID badge project is complete and ready for professional review by eXpress badging®.

AI Prompt Primer: Replace this example with your exact needs:

We have a PNG logo, a JPG badge mockup, and a PDF brand guide. We do not know whether the files are original source artwork, properly sized, editable, layered, RGB, or high enough resolution for badge printing. What is the best course of action to proceed?

Providing Artwork Files

Objective: Select and complete an approved secure method for transferring artwork to eXpress badging®.

  • Review the Upload Center instructions before submitting files.
  • Use the ID Badge File Upload Center for standard submissions.
  • Include accurate contact information and descriptive project comments.
  • Request secure ShareFile access for artwork files larger than 10 MB.
  • Arrange remote server retrieval only through prior authorization with eXpress badging®.

Critical warning: Never email PII-sensitive badge data or photographs; always use an approved secure transfer method.

EBS Knowledge Base—Learn More: How to Securely Transfer ID Badge Project Files Using the Upload Center
Secure gateway for uploading badge artwork and design-guidance files

I need help determining the approved secure method for transferring our ID badge project files to eXpress badging®.

AI Prompt Primer: Replace this example with your exact needs:

We are ready to send artwork files. We may include sample badge data and photographs. Are there and file size restrictions using the eXpress badging  Upload Center? If so, please provide. We can/cannot access the eXpress badging® Upload Center, are there other secure options? Once we subm it the files, how do we confirm reciept?  Do not direct me to email PII-sensitive badge data or photographs. Do not invent an alternative transfer method, assume authorization, approve the submission, or make the final security or production decision.

Color Matching

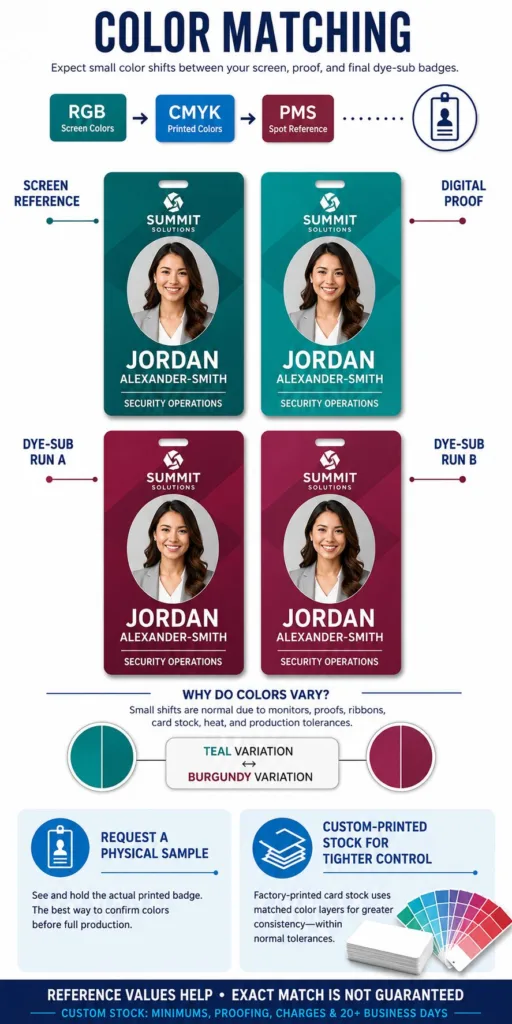
Objective: Establish color references, acceptable variation, and the required approval method before production.

  • Provide applicable RGB, CMYK, or PMS brand-color references.
  • Identify colors for which consistency is especially important.
  • Acknowledge that exact dye-sublimation matching and consistency across production runs cannot be guaranteed.
  • Request a physical printed sample before full production when color is critical.
  • Notify eXpress badging® when tighter color control may require factory-printed custom card stock.

Critical warning: A digital proof cannot guarantee the exact color of the finished badge.

EBS Knowledge Base—Learn More: PVC Badge Printer Technical Design Parameters Overview
I need help documenting the color-matching requirements for our ID badge project.

AI Prompt Primer: Replace this example with your exact needs:

Our logo and badge design use these important brand colors: STATE HERE. Marketing has provided these RGB, CMYK, or PMS references:  STATE HERE. We do/do not have an existing printed badge or approved physical color sample. Color consistency is moderately important/critical because STATE HERE. We do not know whether a digital proof is sufficient. Do not predict exact printed color from a monitor, ujploaded file, promise an exact dye-sublimation match, invent color values or tolerances, approve a sample, or make the final production decision.

Four matching ID badges illustrating dye-sublimation color variations in teal and burgundy

Full-Bleed Designs, Multiple Designs, and Color Coding

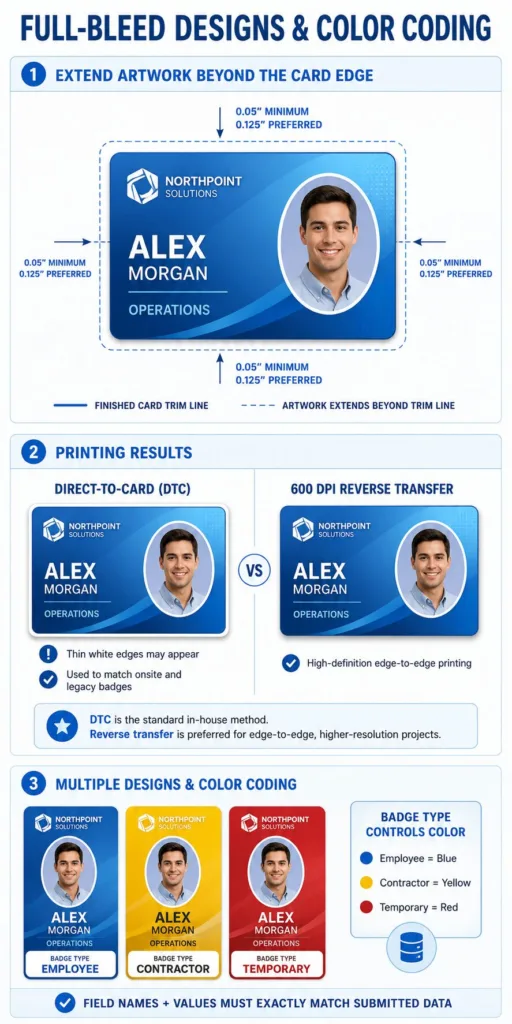
Objective: Confirm bleed requirements, design variants, and data-driven assignment logic before template creation.

  • Identify whether artwork should extend to the finished card edges.
  • Obtain the approved bleed and live-area dimensions for the selected production workflow.
  • Extend backgrounds through the approved bleed area while keeping critical elements within the live area.
  • List every required badge design and color variant.
  • Provide a cross-reference mapping each controlling data field and value to its assigned design or color.
  • Verify that field names and values exactly match the submitted production data.

Critical warning: Never assume one bleed dimension applies to every printer or production workflow.

EBS Knowledge Base—Learn More: PVC Badge Printer Technical Design Parameters Overview
I need help documenting the full-bleed, multiple-design, and color-coding requirements for our ID badge project.

AI Prompt Primer: Replace this example with your exact needs:

We want the background artwork to extend to the card edges. The approved printing workflow and bleed dimensions are [known/unknown].

We require these badge designs or colors:

  • Employee = Blue
  • Contractor = Yellow
  • Temporary = Red

The proposed controlling data field is “Badge Type.” What happens when this field is blank, misspelled, incorrect, or contains a value that has not been assigned to a design? What assignment rules or restrictions should we confirm with eXpress badging®?

We are also considering a solid dark-blue background with white “Stay Safe” lettering. Is this design recommended when near-perfect cosmetic consistency is expected? If we use it, what normal card-surface, printing, edge, or lamination variations may become more noticeable, and what level of variation must we be prepared to accept?

Do not invent bleed dimensions, field names, field values, design assignments, default behaviors, tolerances, or missing production requirements. Do not select the printing method, resolve conflicts through assumption, approve the design, or make the final production decision.

Infographic comparing full-bleed ID badge printing methods and Badge Type color coding

Fonts and Licensing

Objective: Confirm the approved font approach for variable data, editable text, and static artwork before template approval.

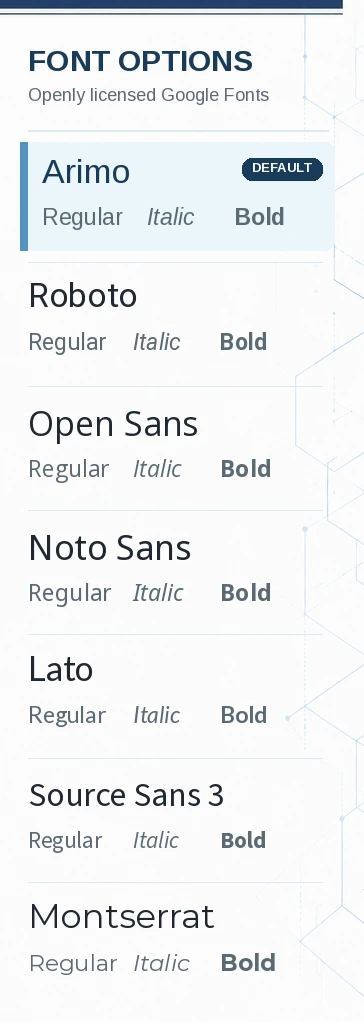
  • Select an approved Veonics® Portal standard font when appropriate.
  • Identify whether a specific corporate font is formally required.
  • Provide the font family, style, version, authorized source file, licensing documentation, and intended appearance.
  • Confirm that the documentation supports the proposed third-party, cloud, and production uses.
  • Use properly licensed outlined or flattened text for applicable static artwork.
  • Submit font changes for the required template review and proofing.

Critical warning: Do not assume a listed or supplied font is approved; confirm its current status with eXpress badging®.

EBS Knowledge Base—Learn More: Font Use and Licensing within the Template Designer
I need help documenting the font and licensing requirements for our ID badge project.

AI Prompt Primer: Replace this example with your exact needs:

Our existing or proposed template uses  STATE FONT. This font appears in variable information such as names and titles/static artwork such as our logo or slogan/both. Our organization does/does not formally require this font. We have/do not have the original authorized font file, version information, purchase record, or licensing documentation. If we do not have the font license, what is the alternate choice?

Do not assume that Arial or any other font is approved, prohibited, licensed, or unlicensed solely because of its name or availability. Do not provide a legal conclusion, approve a font or license, substitute a font, resolve conflicts through assumption, or make the final template or production decision.

Candidate Veonics Portal fonts shown in Regular, Italic, and Bold styles: Arimo, Roboto, Open Sans, Noto Sans, Lato, Source Sans 3, and Montserrat.

Candidate Font Options Under Review

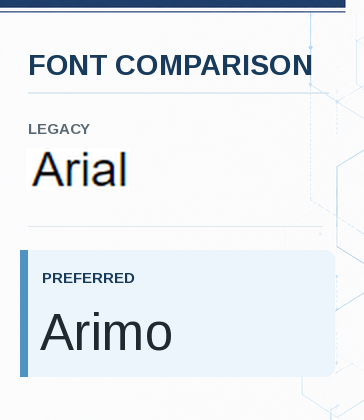
Legacy Arial font compared vertically with preferred Arimo font.

Font Attributes and Automatic Font-Size Reduction

Objective: Define and test each text field’s font attributes and fitting behavior before template approval.

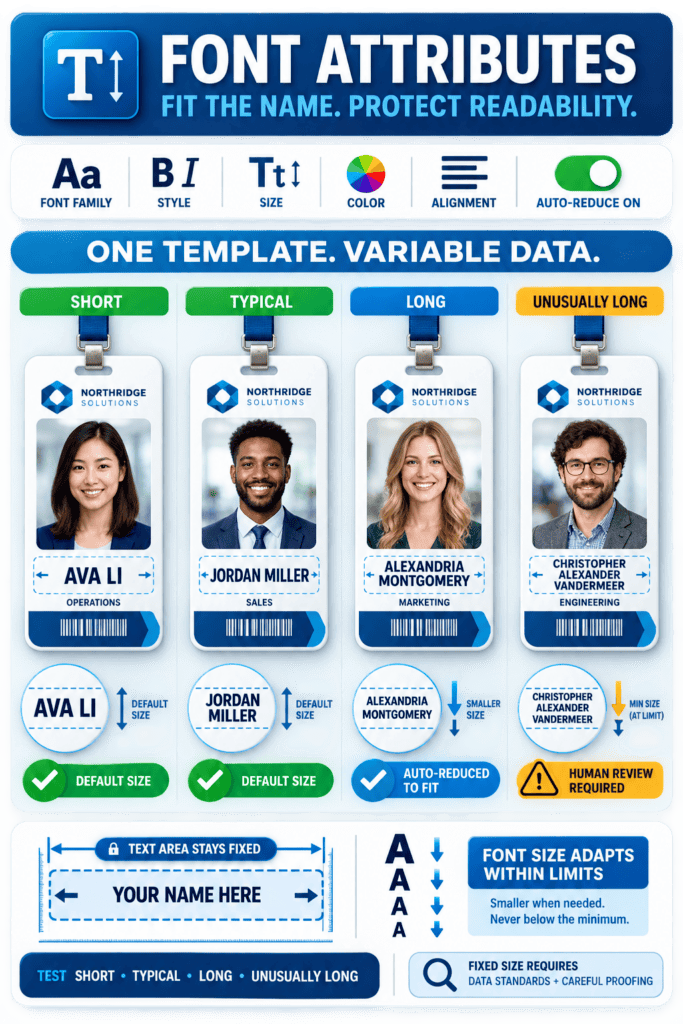
  • Configure the approved font, style, size, color, alignment, and field dimensions.
  • Enable automatic font-size reduction when variable data lengths must fit.
  • Use fixed sizing only when consistent text size is the priority.
  • Test short, typical, and unusually long values in every variable field.
  • Establish approved abbreviations or data limits for fixed-size fields.
  • Correct entries that clip, overlap, overflow, or become unreadable.

Critical warning: Exceptionally long values may remain unreadable or exceed the available area even when automatic reduction is enabled.

EBS Knowledge Base—Learn More: How to Use the Badge Template Designer
I need help documenting the font attributes and text-fitting behavior for our ID badge fields.

AI Prompt Primer: Replace this example with your exact needs:

We need to define the font attributes and text-fitting behavior for our ID badge fields. Our variable fields include Full Name, Title, Department, and Employee ID. The approved font is  STATE HERE. We want automatic font-size reduction/fixed sizing. Our shortest, typical, and longest sample values are  FROM to TO. Do not invent field dimensions, font sizes, reduction limits, sample data, abbreviations, or data-entry rules. Do not resolve conflicts through assumption, approve the template, modify submitted data, or make the final technical or production decision.

Four ID badges showing automatic font-size reduction for names of different lengths

Badge Photos and Orientation

Objective: Define the approved badge orientation, photo format, cropping, and headshot position before template development.

  • Confirm portrait or landscape badge orientation.
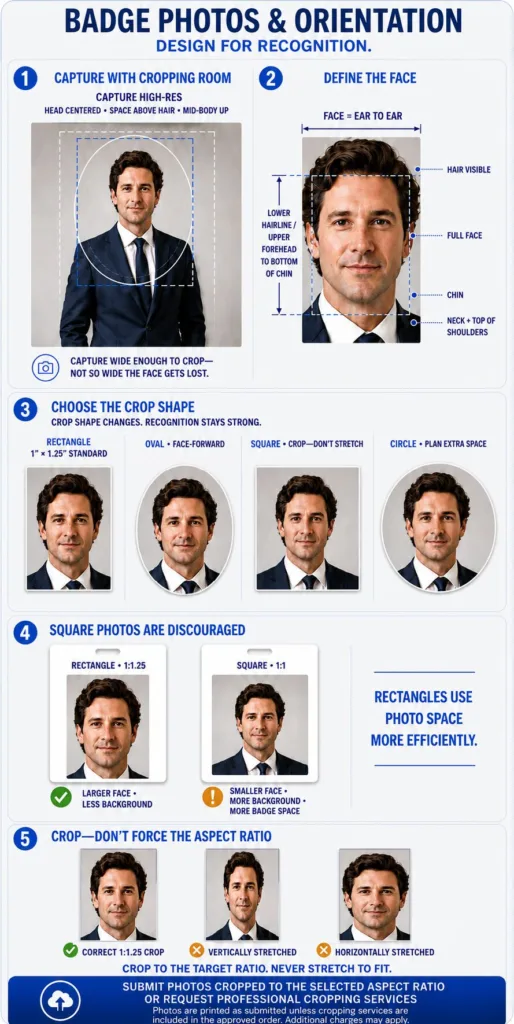
  • Select rectangular, oval, or circular photo presentation and its compatible source crop.
  • Document whether the standard 1″ W × 1.25″ H rectangular format and 4:5 aspect ratio will be used.
  • Center the complete face from ear to ear and head to chin, retaining the hair.
  • Apply approximate face-width coverage of 75% for rectangular, 65% for oval, and 50% for circular photos.
  • Review every submitted photo for cropping, position, resolution, and orientation.

Critical warning: Photos are printed as submitted; Production does not retouch, reposition, zoom, or crop them unless the applicable service is procured and specified.

EBS Knowledge Base—Learn More: What Is the Industry Standard Photo Size for an ID Card or Badge?
I need help documenting the badge-photo and orientation requirements for our ID badge project.

AI Prompt Primer: Replace this example with your exact needs:

Our badges will be worn in STATE HERE (portrait/landscape) orientation. We plan to use STATE HERE (rectangular, square, oval, or circular)  photo presentation. Our source photos currently use STATE HERE (1″ x 1/25″)  dimensions, aspect ratio, resolution, and cropping. Photos will be captured or provided through STATE HERE. We have/do not have an approved organizational photo standard. We will/will not procure a photo-cropping service.

Ask focused questions about the badge orientation, photo shape, compatible source crop, face position, resolution, existing-photo suitability, and responsibility for reviewing and cropping photos before submission.

Identify what is known, what remains unknown, conflicts requiring confirmation, and questions or next actions for eXpress badging®.

Do not identify individuals, match photographs to people, or determine whether a photo belongs to a specific person. Do not invent requirements, resolve conflicts through assumption, approve the project, or make the final technical or production decision.

Other Photo Related Prompts:

Existing-photo review: I need help determining whether our existing badge photos are suitable. They currently use STATE HERE dimensions, aspect ratio, resolution, cropping, and orientation. Identify possible concerns and what eXpress badging® must confirm.

Photo-format decision: I need help comparing rectangular, oval, and circular photo presentation for our badge design. Our proposed format and available source crops are STATE HERE. Identify the information still needed without selecting the final format.

Orientation change: I need help documenting a proposed change from STATE HERE orientation or photo format to STATE HERE. Our existing photos were cropped using STATE HERE specifications. Identify possible compatibility, resizing, or cropping concerns requiring confirmation.

ID badge photo guide showing correct face cropping, photo shapes, sizes, and aspect-ratio distortion

Backside Printing: Make the Space Count

Objective: Define the backside purpose, content, and production approach before template development.

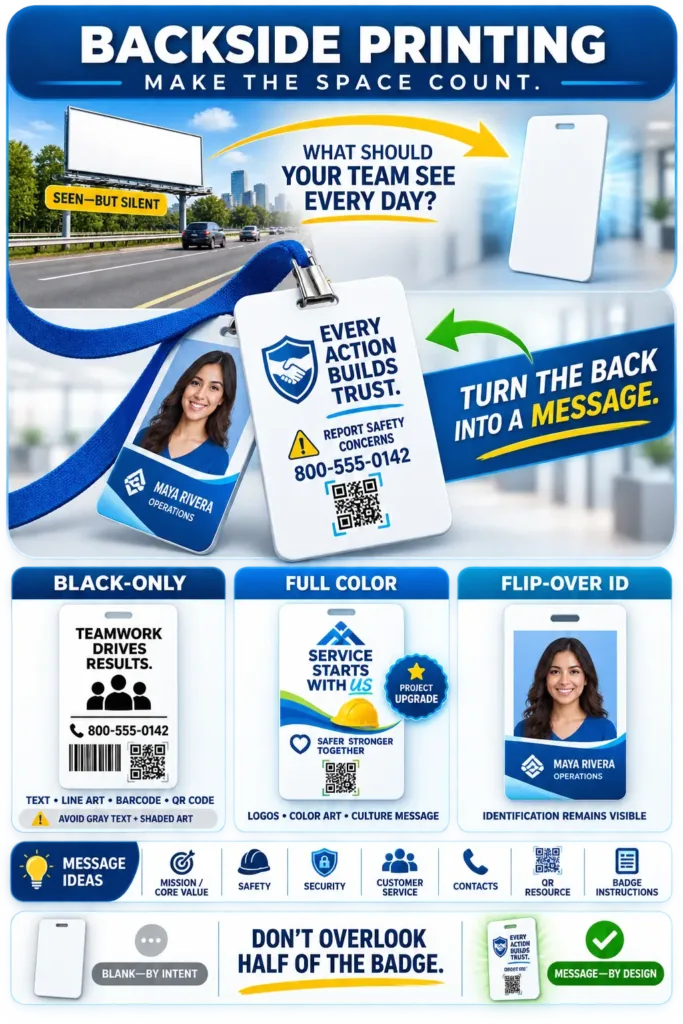
  • Decide whether the back will remain blank or serve a documented purpose.
  • Identify fixed or variable content and approve the exact wording, barcode, QR code, or destination.
  • Select black-only or full-color backside printing.
  • Document whether the back will be printed during personalization or supplied factory-preprinted.
  • Assess whether frequently changing or expanded content belongs on a Badge Buddy or secondary information badge.
  • Verify front-to-back orientation and readability at actual badge size.

Critical warning: Factory-preprinted backs create an inventory commitment; changed content may require controlled use or disposal of remaining stock.

EBS Knowledge Base—Learn More: Printing on the Back of an ID Badge
I need help documenting the backside printing requirements for our ID badge project.

AI Prompt Primer: Replace this example with your exact needs:

Replace, remove, or expand each statement below to reflect our exact project.

We want the back of the badge to promote STATE HERE. Its intended purpose is to provide tips or guidance, reinforce organizational values or required steps, duplicate key front-side information for flip protection, or STATE HERE. The proposed wording, images, barcode, QR code, or other content is attached or provided here: STATE HERE.

The content is fixed or varies according to STATE HERE and is expected to change every STATE HERE. We prefer black-only printing, full-color printing, factory-preprinted card stock, a Badge Buddy or secondary information badge, or STATE HERE. Should we consdier using department or badge type logic to select various versions of the back, for example employees, faculty, staff, medical certified, security, executive, vendors, contractors, temp-labor, all having relative back sttatments.  Please provdie sample for these: STATE HERE

Our printing method is STATE HERE: direct-to-card or reverse-transfer. Our printer is STATE HERE: single-sided or dual-sided. Our initial quantity, recurring volume, and expected reorder schedule are STATE HERE.

The approved front-to-back orientation is STATE HERE: landscape front/landscape back, landscape front/portrait back, portrait front/portrait back, or portrait front/landscape back. Information that still requires internal approval is STATE HERE.

Ask focused questions about missing content, expected changes, printing method, color, quantities, preprinted-stock exposure, orientation, and whether a secondary information badge should be considered.

Organize the response into:

  1. What is known
  2. What remains unknown
  3. Conflicts or concerns requiring confirmation
  4. Questions or next actions for eXpress badging®

Other Backside Printing Prompts:

Name-display decision: I need help comparing whether to print a preferred first name and last initial on the front and the full legal first and last name on the back, or keep all required name information on the front. Identify the privacy, identification, readability, badge-flip, and operational questions that require confirmation. Do not select the final name-display policy.

Printing and cost comparison: I need help comparing black-only printing, full-color printing, and factory-preprinted backs. Our printer technology is STATE HERE. Our initial quantity, recurring volume, and reorder frequency are STATE HERE. Our required colors are STATE HERE. We expect the backside content to change every STATE HERE. Our other backside concerns are STATE HERE. Identify the production, inventory, cost, and obsolescence questions that require confirmation.

Secondary information badge: I need help deciding whether content should print on the primary badge or appear on a Badge Buddy or secondary information badge. The proposed content, audience, update frequency, visibility requirements, and attachment method are STATE HERE.

Do not draft or approve security, safety, Human Resources, clinical, or legal language. Do not invent requirements, resolve conflicts through assumption, approve the project, or make the final technical or production decision.

Infographic comparing blank, black-only, full-color, and duplicated-front ID badge backside designs

Slot-Punch Planning and Card Durability

Objective: Confirm the approved slot location, attachment method, and compatibility with finished cards before production.

  • Select direct slot attachment, a protective holder, or another approved method.
  • Confirm wear orientation and the intended clip, lanyard, or reel.
  • Apply the project-approved slot guide to front and back designs.
  • Keep printed content and attachment hardware clear of the slot.
  • Verify compatibility with card stock, lamination, and embedded technology.
  • Produce and test a finished sample before full production.

Critical warning: Never slot-punch an RFID or technology card unless the exact card model and manufacturer-approved location are confirmed.

EBS Knowledge Base—Learn More: Slot-Punch Planning for ID Badges: Placement, Durability, and RFID Safety
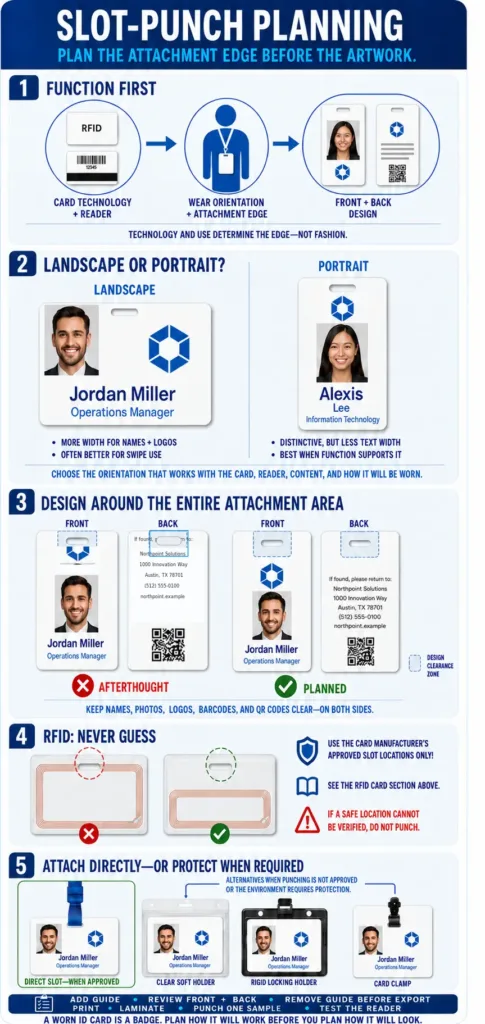
I need help documenting the slot-punch, attachment, and card-durability requirements for our ID badge project.

AI Prompt Primer: Replace this example with your exact needs:

Replace, remove, or expand each statement below to reflect our exact project.

Our badges will be worn in a portrait or landscape orientation. The intended attachment is STATE HERE: strap clip, lanyard, badge reel, protective soft clear badge holder, hard plastic badge holder, or another attachment.

We plan to attach the badge via a direct slot punch on the card and use the previously mentioned holder(s). Our card stock is  STATE HERE: 100% PVC, composite, or unknown. Our front-and-back lamination requirements are STATE HERE.

The badge contains STATE HERE: no embedded technology, RFID, contactless technology, a contact chip, magnetic stripe, or other features. The card manufacturer and exact product number are STATE HERE. The manufacturer-approved slot location, punch markings, and current antenna diagram are STATE HERE.

Ask focused questions about missing attachment details, wear orientation, artwork clearance, card construction, lamination, embedded-technology restrictions, manufacturer specifications, and finished-sample testing.

Organize the response into:

  1. What is known
  2. What remains unknown
  3. Conflicts or concerns requiring confirmation
  4. Questions or next actions for eXpress badging®

Other Slot-Punch Planning Prompts:

Attachment-method decision: I need help comparing direct slot attachment with a protective badge holder. Our badge orientation, intended clip, lanyard or reel, usage frequency, environment, and card technology are STATE HERE. Identify the durability, compatibility, and testing questions requiring confirmation without selecting the final attachment.

Artwork-clearance review: I need help reviewing whether our frontside and backside designs allow sufficient clearance for the slot and attachment hardware. Our approved slot guide and designs are attached or STATE HERE. Identify content that may be too close to or covered by the attachment without approving the design or estimating the physical punch location.

Technology-card and durability review: I need help documenting whether our proposed RFID or technology card can be slot-punched and how the slot area should be protected. The card manufacturer, product number, card material, lamination, approved punch markings, antenna diagram, attachment, and expected use are STATE HERE.

Do not estimate or approve a punch location using generic measurements, photographs, flashlight inspection, or another card model. Do not infer an antenna location or treat a visual inspection as manufacturer approval. Do not invent requirements, resolve conflicts through assumption, approve the project, or make the final technical or production decision.

ID badge slot-punch planning infographic comparing landscape and portrait designs, slot clearance, RFID precautions, and attachment options

Define the Badge-Design Requirements

Objective: Consolidate the approved badge-design and production requirements before selecting a template or design-service level.

  • Document badge orientation, card format, frontside and backside printing, and required content.
  • List fixed text, variable fields, data formats, and representative sample values.
  • Provide approved branding assets and define the required photo format and presentation.
  • Define badge types, color-coding, design logic, and control values.
  • Record attachment, slot, lamination, barcode, RFID, magnetic-stripe, and encoding needs.
  • Confirm printing method, quantities, sorting, packaging, shipping, testing, and approval responsibilities.

Critical warning: Identify missing, conflicting, or unapproved requirements before template development begins.

EBS Knowledge Base—Learn More: This ID Badge Design Guide is the controlling reference for documenting these requirements.
I need help documenting the complete badge-design requirements for our ID badge project.

AI Prompt Primer: Replace this example with your exact needs:

Replace, remove, or expand each statement below to reflect our exact project.

Our organization and the purpose of this badge program are STATE HERE. The people or populations receiving badges are STATE HERE.

Our confirmed badge orientation, card format, material, printing method, and frontside and backside requirements are STATE HERE.

The fixed wording, variable data fields, data formats, identification numbers, and representative short, typical, and unusually long values are STATE HERE.

Our approved logos, artwork, colors, fonts, brand standards, photo format, photo presentation, and other visual requirements are STATE HERE.

Our badge types, classifications, color-coding rules, design variations, controlling fields, permitted values, and design logic are STATE HERE.

Our barcode, QR code, RFID, magnetic-stripe, contact-chip, encoding, reader, scanner, and other technology requirements are STATE HERE.

Our attachment, slot-punch, lamination, overlay, durability, and wearing requirements are STATE HERE.

Our estimated quantities, recurring volumes, production method, sorting, grouping, packaging, shipping, issuance, and rollout requirements are STATE HERE.

The individuals or departments authorized to approve branding, data, security, technology, production, and final proofs are STATE HERE.

Requirements that remain unknown, disputed, incomplete, or subject to approval are STATE HERE.

Using only the information supplied, create a numbered list of the 20 most important badge-design and production issues or decisions that must be confirmed. For each item, label its status as Confirmed, Missing, Conflicting, or Approval Required. Explain why each unresolved item matters and identify the person or department that should answer it when that information has been provided.

Organize the response into:

  1. What is known
  2. Top 20 requirements and decision status
  3. Conflicts or concerns requiring confirmation
  4. Missing information
  5. Questions and next actions for eXpress badging®

Do not draft or approve security, Human Resources, safety, clinical, or legal policies. Do not invent requirements, resolve conflicts through assumption, approve the project, or make the final technical or production decision.

Other Badge-Requirement Prompts:

Requirements gap review: I need help identifying gaps in our badge-design requirements. Our current requirements are STATE HERE. Categorize each item as confirmed, missing, conflicting, or requiring approval. Ask focused questions without selecting the answers.

Stakeholder alignment: I need help comparing badge requirements supplied by Security, Human Resources, Information Technology, Marketing, Operations, and Procurement. Their requirements are STATE HERE. Identify agreements, conflicts, ownership questions, and decisions that require joint approval.

Production-readiness review: I need help determining whether our documented badge requirements are ready to provide to eXpress badging®. Our orientation, content, data, photographs, branding, badge types, logic, technology, production, testing, and delivery decisions are STATE HERE. Identify incomplete information and next actions without approving the project.

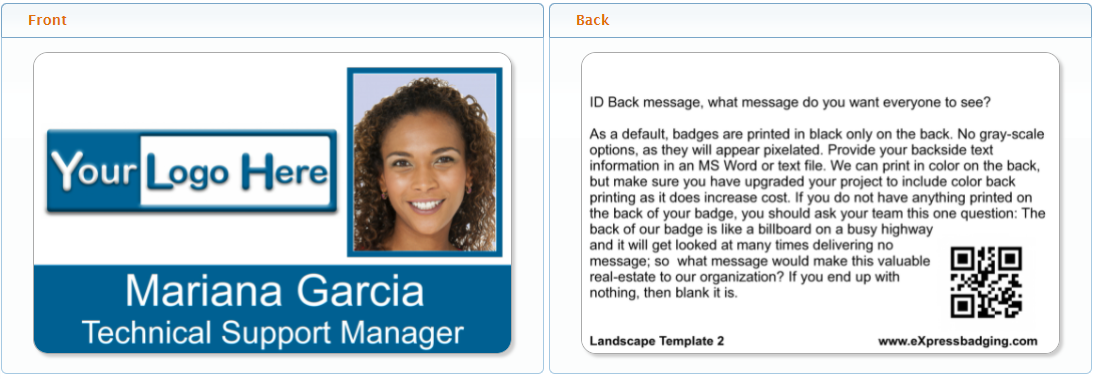
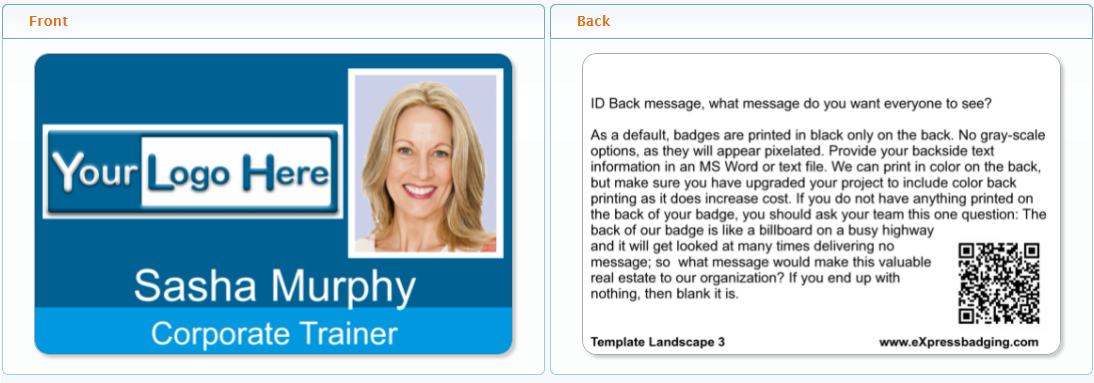
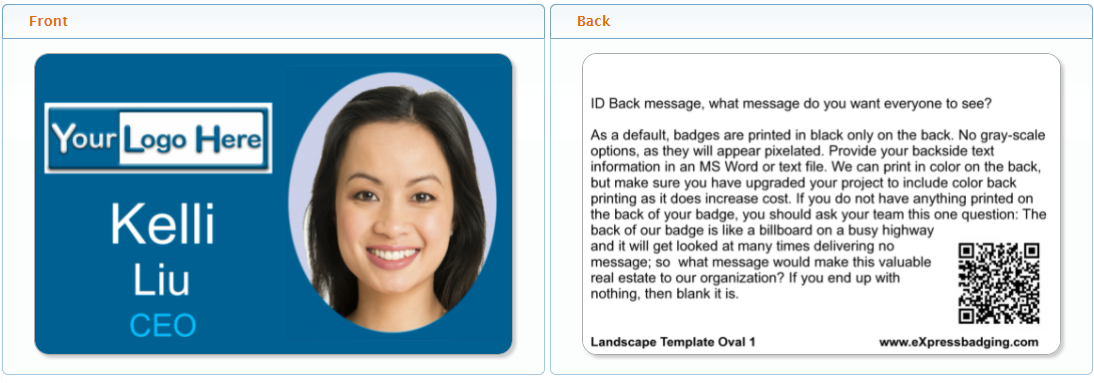
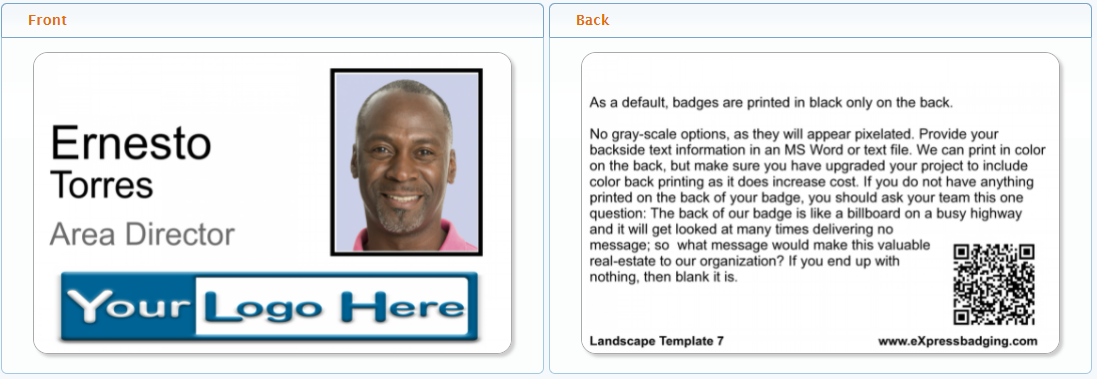
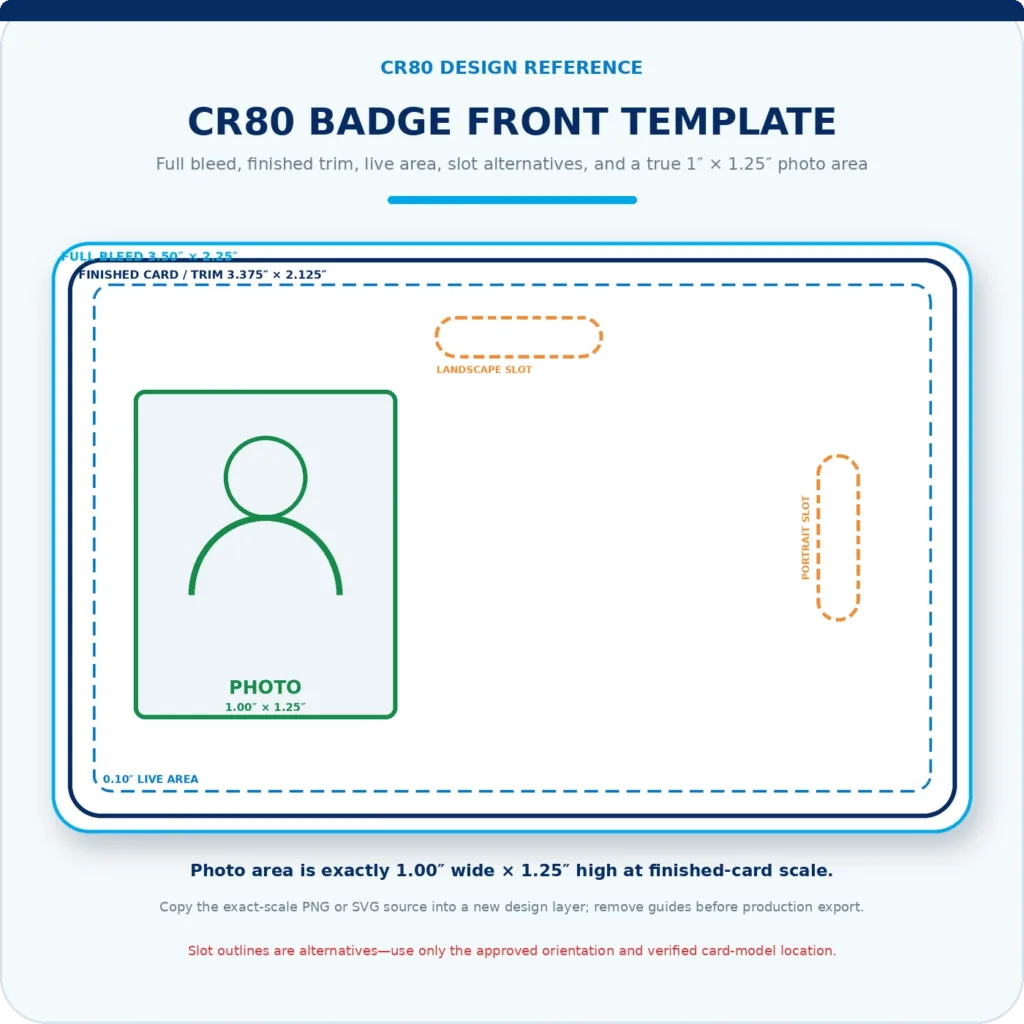
Landscape photo ID badge front showing an organization logo, employee photograph, name, title, identification number, and top and right slot guides.
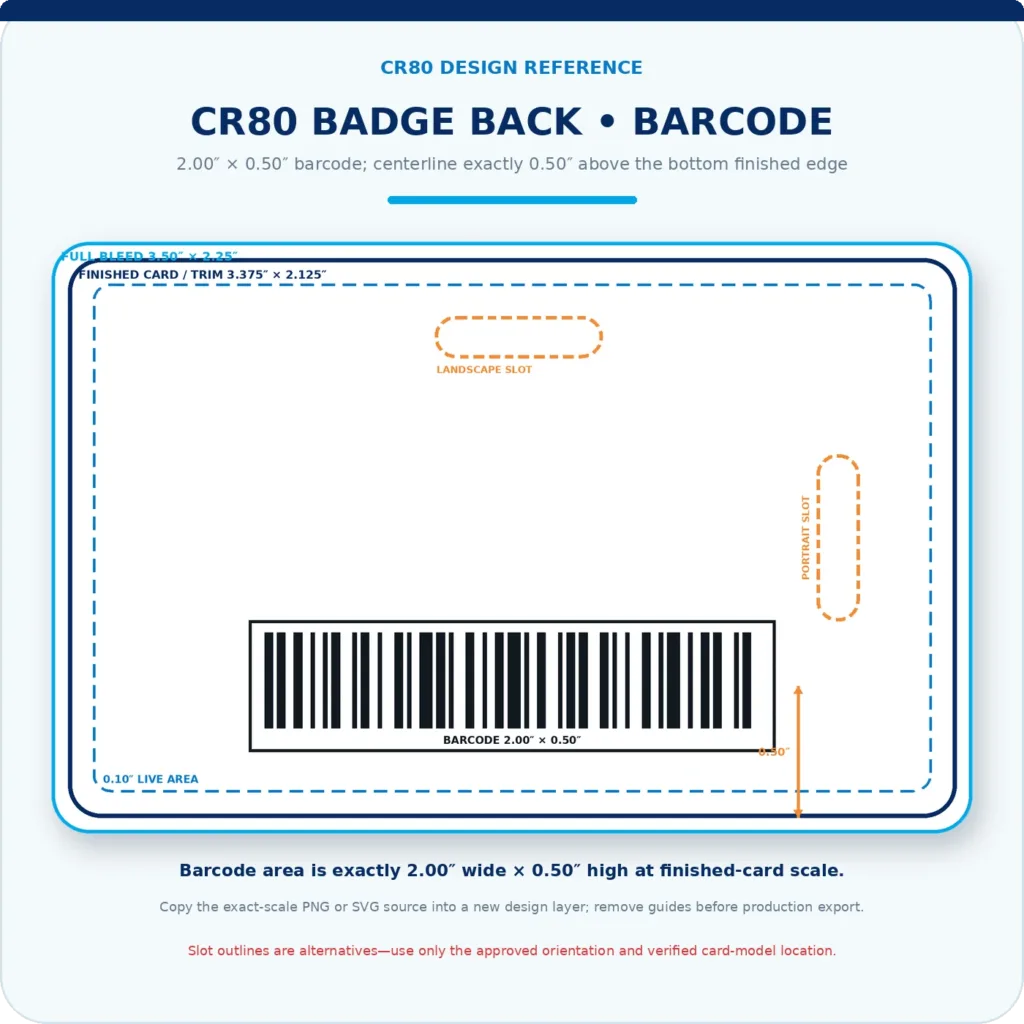
Landscape photo ID badge back showing a 2-inch by one-half-inch barcode centered one-half inch from the bottom edge, with top and right slot guides.
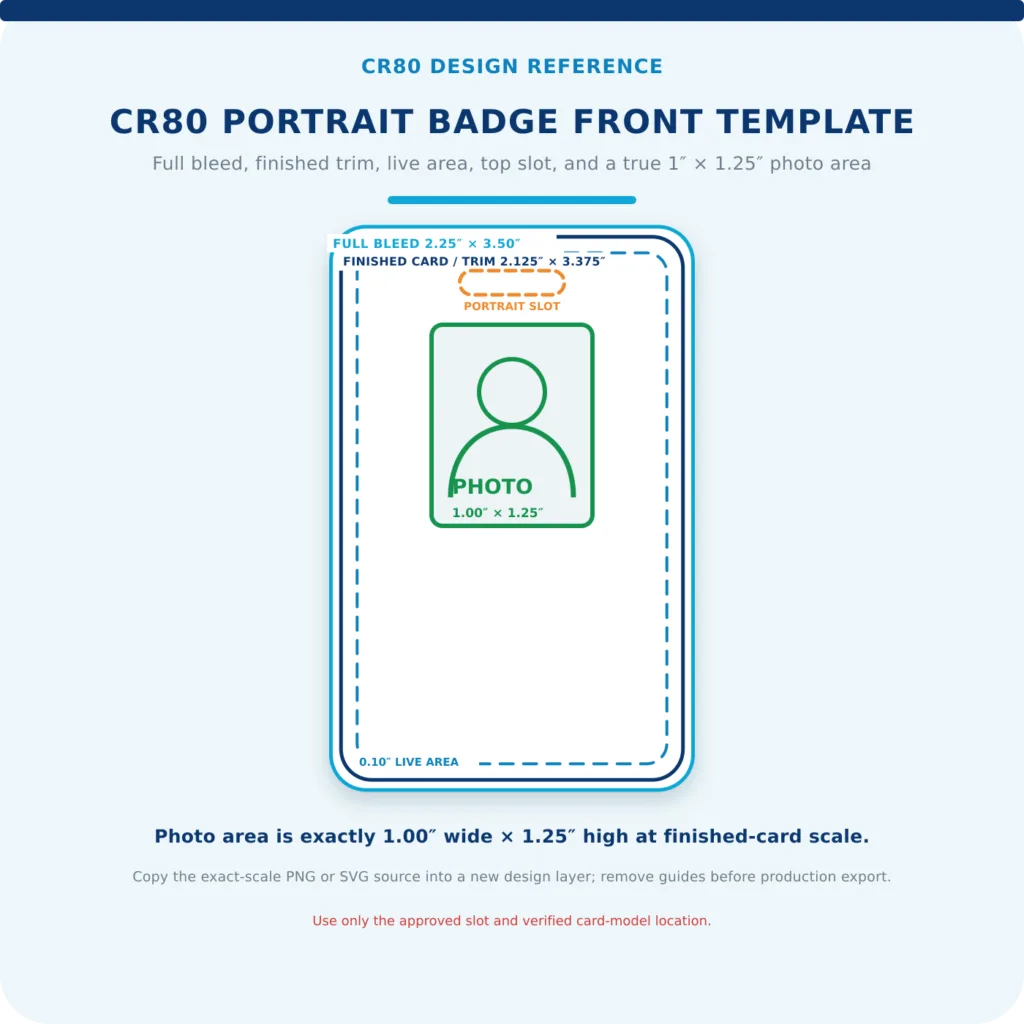
CR80 portrait badge front template showing full bleed, finished trim, live area, top slot, and centered 1 by 1.25 inch photo area.
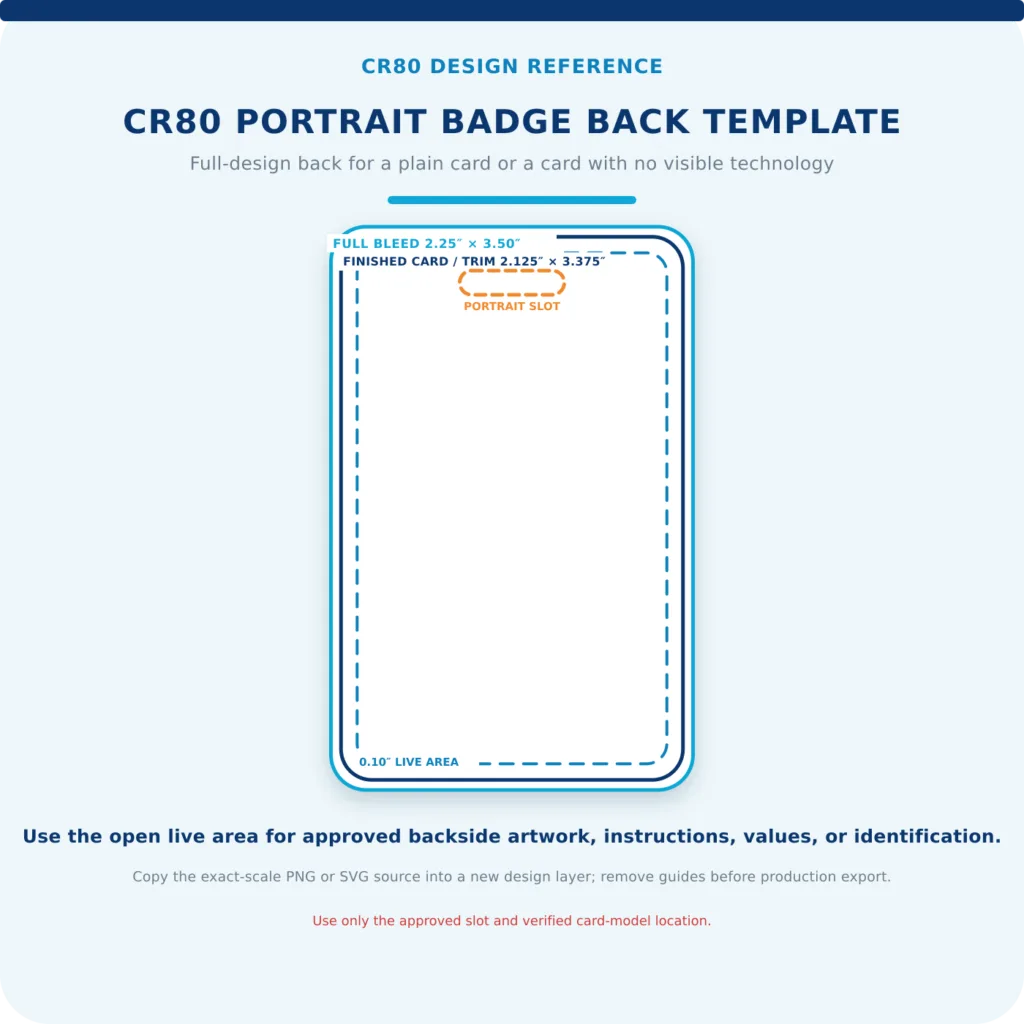
CR80 portrait badge-back template showing full bleed, finished trim, live area, top slot, and open backside design area.

Sample Badge Templates

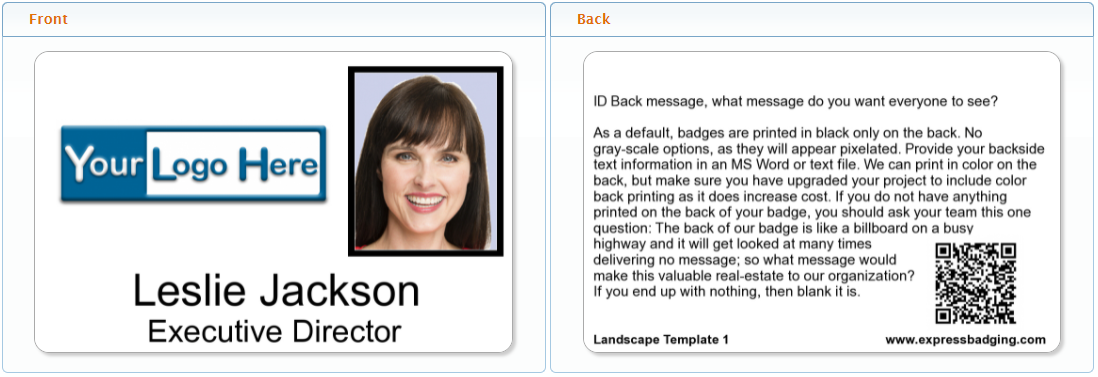
Click on an image below to see the virtual badge.
Template Selection Tips

Objective: Select a template, take a screenshot, make edits in your favorite image editor, and securely submit it with your order.

  • Select from the listed templates here, or provide your own design guidance images.
  • Provide approved fixed artwork, variable fields, front-and-back requirements, design logic, and production specifications.
  • Review the Veonics® Virtual ID by selecting a template, take a screenshot of the sample, make edits in Paint Brush, and securely submit it back through our Upload Center.

Critical warning: The Design Service Level purchased will affect the level of customization available.

EBS Knowledge Base—Learn More: ID Badge Design Service Levels and Related Project Services
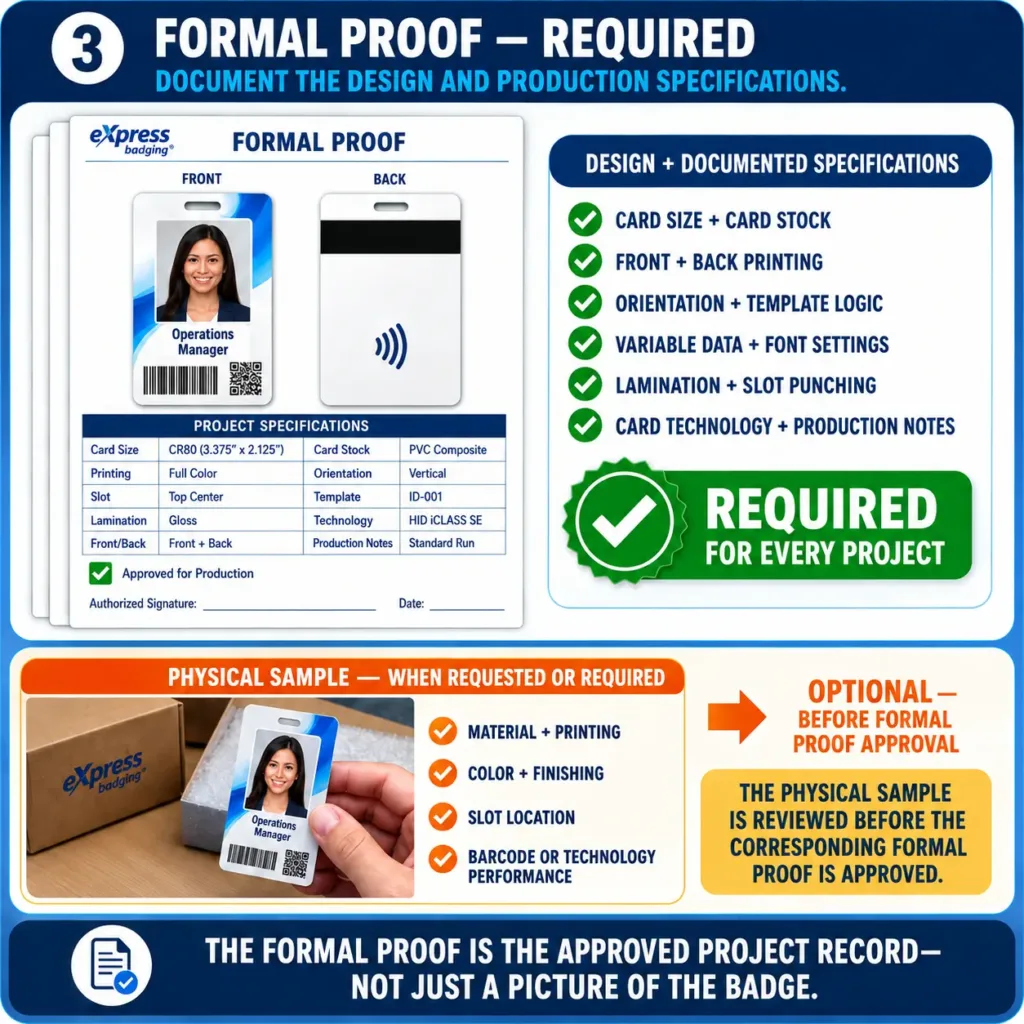
Formal ID badge proof documenting the front and back design and production specifications beside an optional physical badge sample review.

I need help designing our new photo ID badge as both a security resource and a name badge; ensuring that it is correctly branded and meets our marketing standards; documenting the template-selection, design-development, and proofing requirements; and verifying that the finished badges ultimately satisfy those requirements.

Before creating any designs or artwork, review the complete eXpress badging® ID Badge Design Guidelines.

Identify the 20 most important design, production, operational, and proofing issues we should understand and resolve before beginning the project.

For each issue, provide:

  1. Issue or decision
  2. What we should do
  3. What we should not do
  4. Why it matters
  5. What information or approval is required
  6. Who should confirm it: our organization, eXpress badging®, the card or technology manufacturer, or another qualified party

Include, when applicable:

  • Badge purpose and identification priorities
  • CR80 card size and portrait or landscape orientation
  • Direct-to-card or reverse-transfer printing
  • Printer resolution and production configuration
  • Card material and embedded technology
  • RFID, contactless, magnetic-stripe, or encoding restrictions
  • Frontside and backside requirements
  • Logo size, placement, and brand standards
  • Photo dimensions, shape, cropping, and positioning
  • Preferred-name, legal-name, department, and identification fields
  • Readability at the badge’s actual finished size
  • Font selection, licensing, and automatic font-size reduction
  • Short, typical, long, and unusually long variable-data values
  • Full-bleed artwork, live areas, and rounded-corner clearance
  • Multiple designs, badge classifications, and color-coding logic
  • Slot punching, lanyards, clips, reels, and protective holders
  • Barcodes and QR codes
  • Artwork format, resolution, color mode, and source files
  • Veonics® Virtual ID, formal-proof, physical-sample, and P3 review
  • Final production-data and technology testing

Rank the issues in the order they should normally be addressed. Separate decisions that must be made before design begins from items that must be verified during proofing and production approval.

Conclude with:

  1. The ten most important questions we should answer internally
  2. The ten most important questions or confirmations for eXpress badging®
  3. The materials, files, specifications, and sample data we should gather
  4. The most common mistakes that would require redesign, re-proofing, delayed production, or reprinting

Do not create badge artwork, select a final design, invent missing requirements, estimate an RFID antenna or slot-punch location, approve security or policy language, promise exact printed color, or make the final technical or production decision.

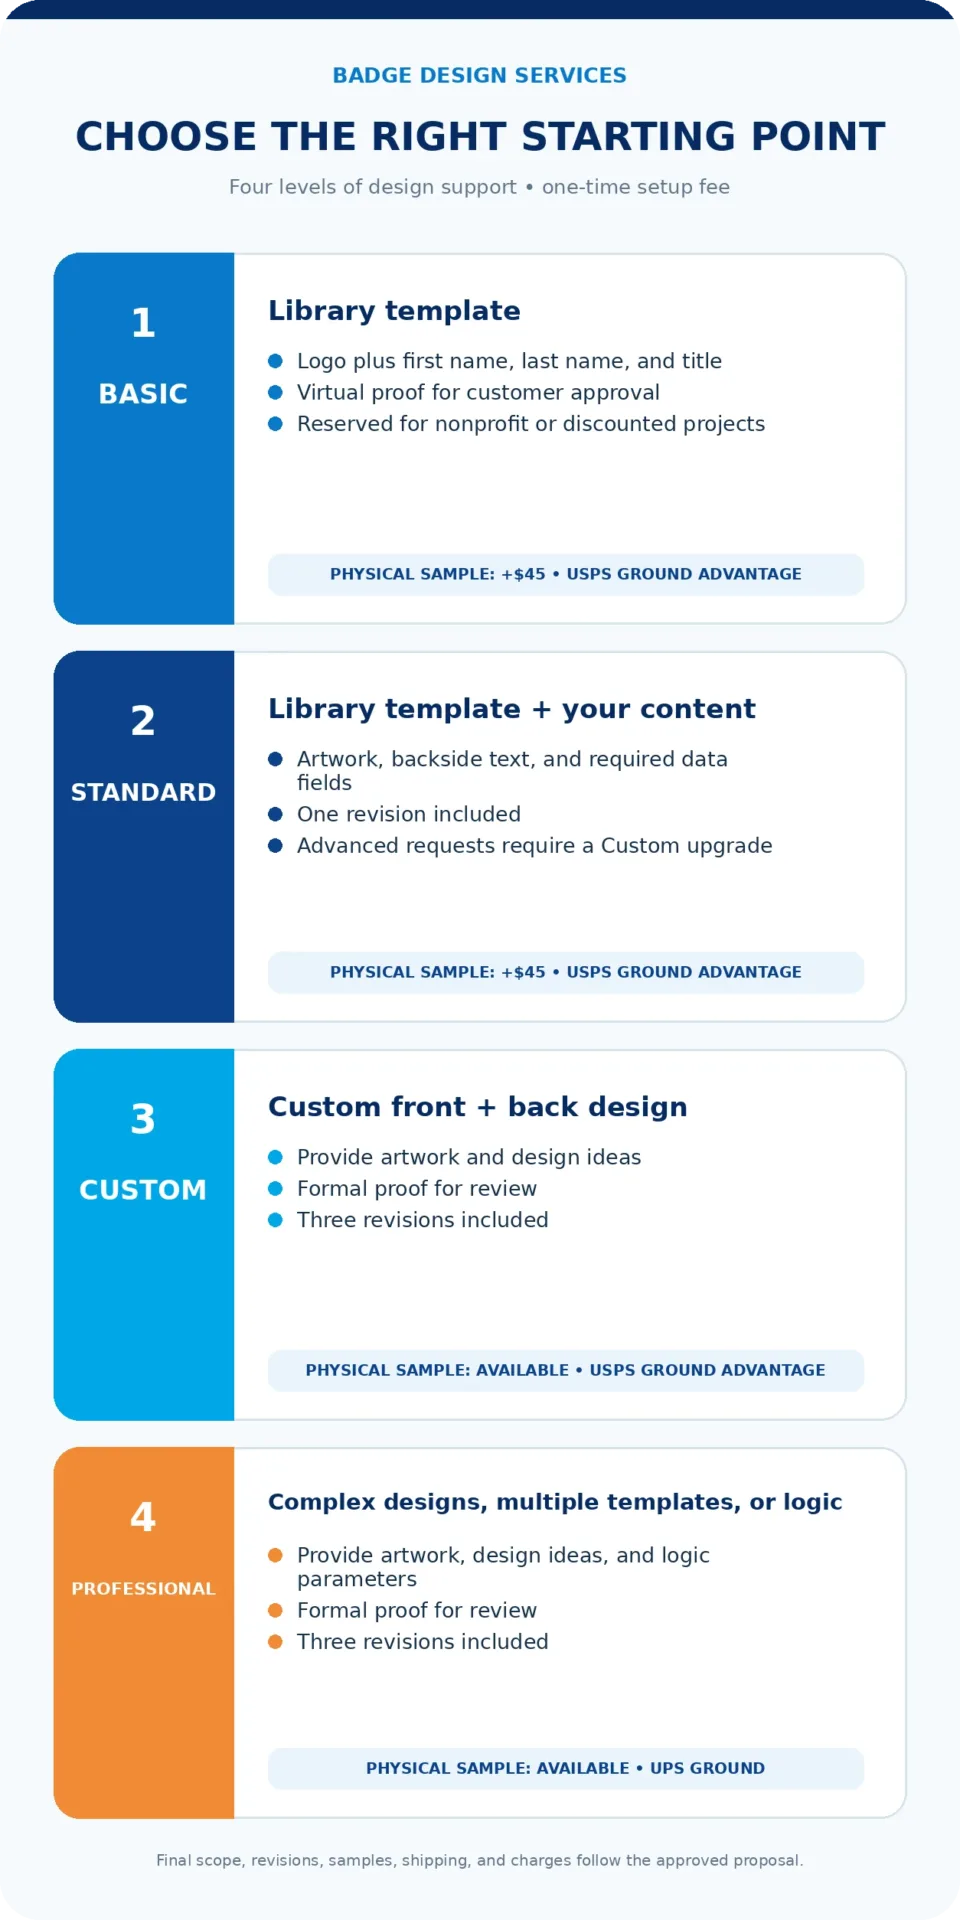
Select the Design-Service Level

Objective: Select and document the design-service level and related services matching the approved badge requirements.

  • Compare the project with Basic, Standard, Custom, Professional, and Enterprise service scopes.
  • Identify whether the work uses a template, requires an original design, includes multiple designs or data-driven logic, or requires a managed re-badge implementation.
  • Confirm included revisions, proof deliverables, service capacity, and customer responsibilities.
  • Add required P3, physical-sample, file-to-print, CELLfie™, barcode, magnetic-stripe, RFID, or other setup and testing services not expressly included.
  • Document scope, inclusions, exclusions, pricing, and customer authorization before work begins.

Critical warning: Do not assume Professional or Enterprise includes every setup, proofing, P3, or technology-testing service.

EBS Knowledge Base—Learn More: ID Badge Design Service Levels and Related Project Services
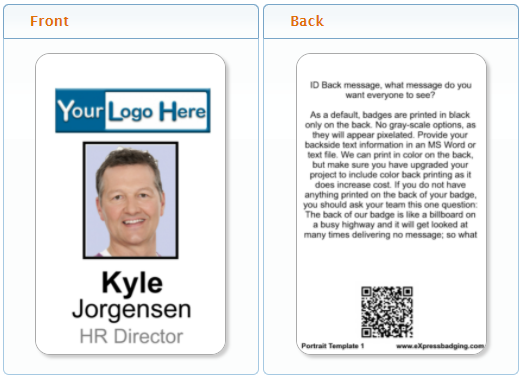
Comparison of Basic, Standard, Custom, and Professional photo ID badge design services, including design scope, revisions, proofing, and physical-sample shipping.

Develop and Approve the Production Template Proof

Objective: Complete development and formal approval of the production template proof before production-data review or printing.

  • Submit approved requirements, artwork, content, data fields, and production specifications.
  • Review the initial Veonics® Virtual ID (pre-proof) against the approved design requirements.
  • Consolidate the corrections into a single documented response and review the revised Virtual ID thoroughly.
  • Review any requested or required physical sample before approving the corresponding formal proof.
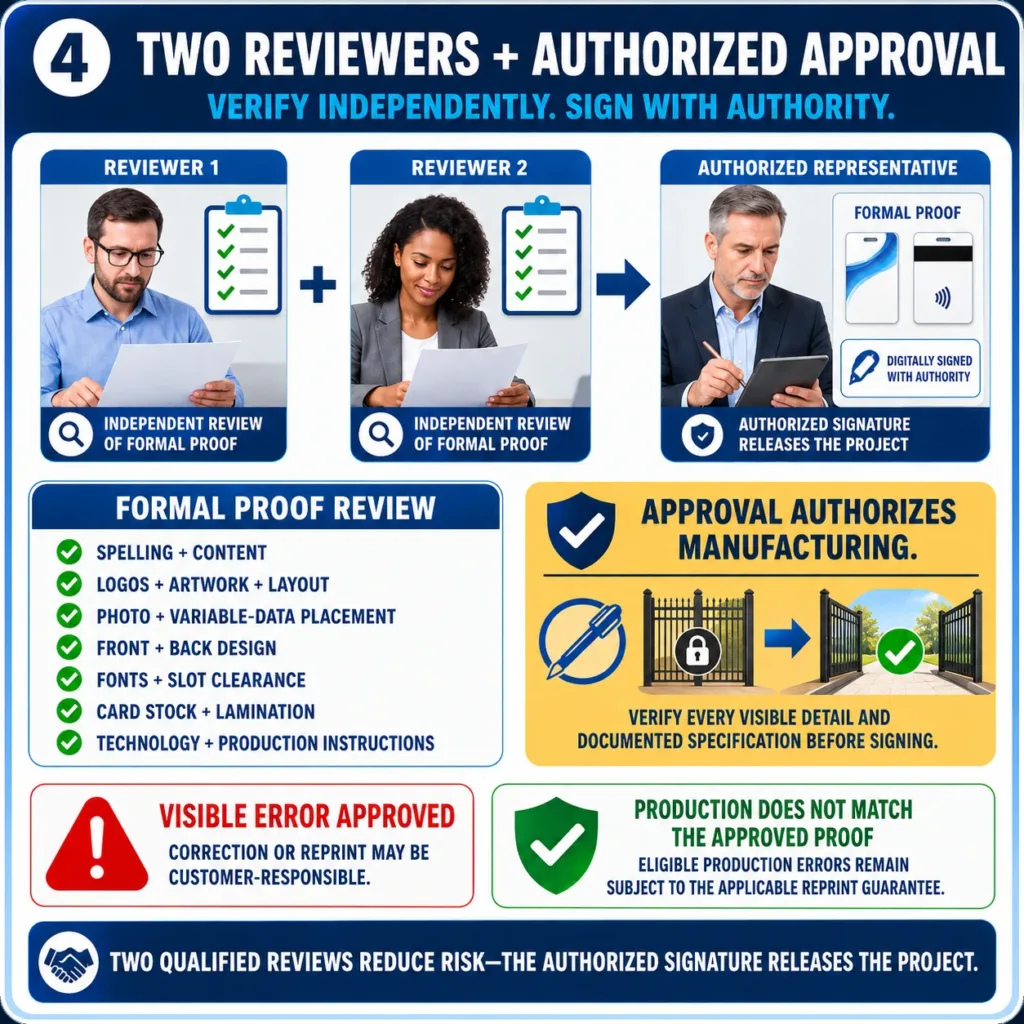
  • Have at least two authorized and qualified individuals review the latest formal proof, then obtain approval from an authorized customer representative.

Critical warning: Do not approve while corrections, placeholders, unanswered questions, or unconfirmed specifications remain.

EBS Knowledge Base—Learn More: ID Badge Proofing and Production Approval
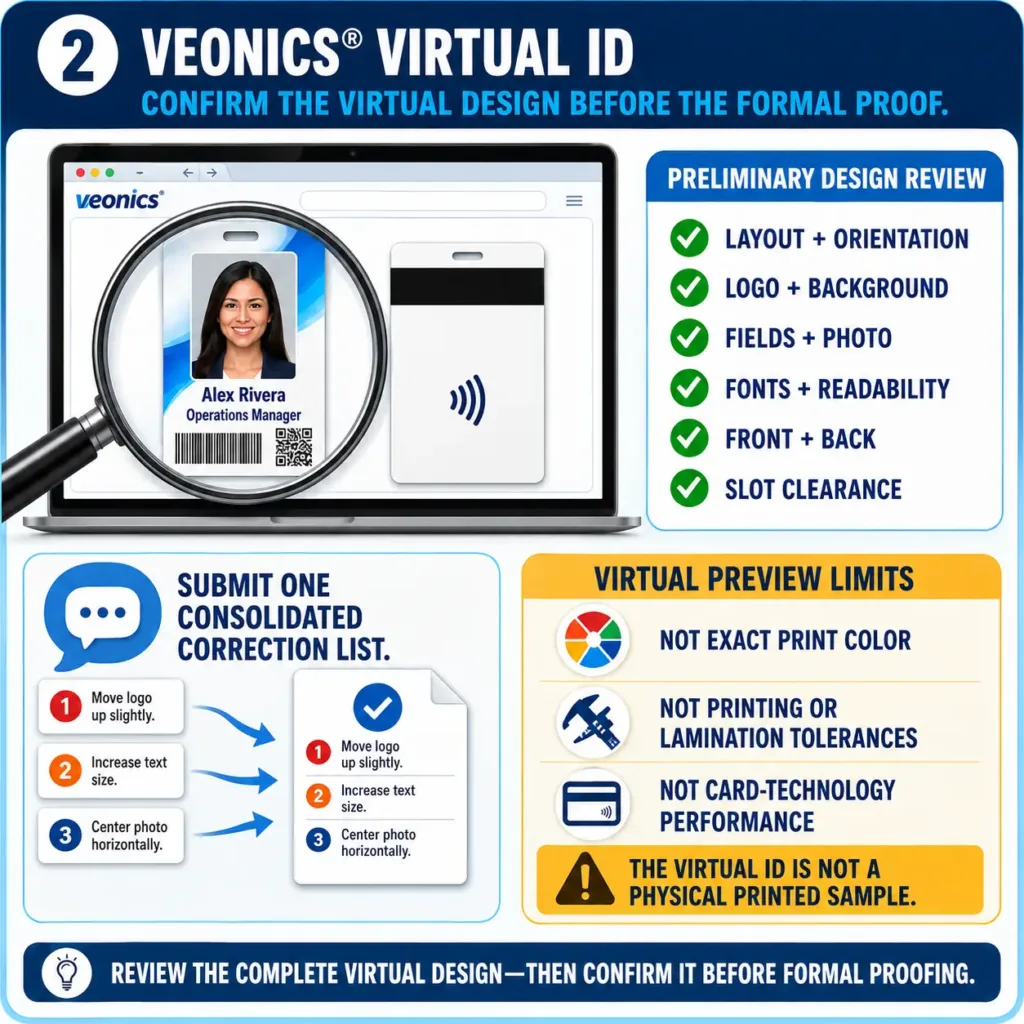
Veonics® Virtual ID review showing the front and back badge design, preliminary review checklist, consolidated corrections, and limitations of a virtual preview.
Formal ID badge proof documenting the front and back design and production specifications beside an optional physical badge sample review.
Two independent reviewers examine a formal ID badge proof before an authorized representative signs and releases the project for manufacturing.

ID Badge Technology Testing

Objective: Complete compatibility testing and signed approval for every system that must read, scan, encode, or use the badge.

  • Inventory each PACS, time-and-attendance, identification, or other system requiring badge compatibility.
  • Provide the card technology, encoding specifications, reader information, and test requirements for each system.
  • Test approved samples with each system and required function.
  • Record results on a separate eXpress badging® technology-testing form for each system, even when systems share one card technology.
  • Resolve failed or inconsistent results and repeat affected testing.
  • Obtain an authorized customer signature on every required testing form before production.

Critical warning: Design-proof approval does not confirm technology compatibility or replace signed system testing.

EBS Knowledge Base—Learn More: ID Badge Technology Discovery, Testing, and Approval

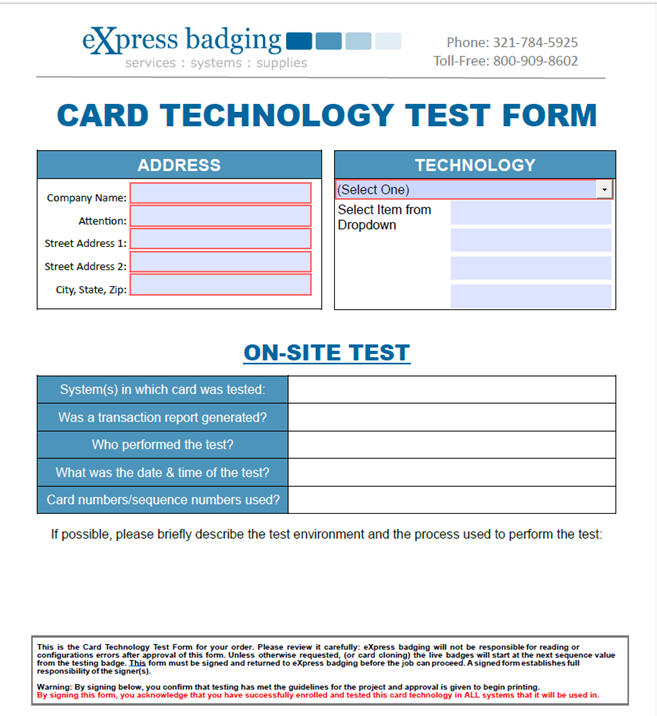
id badge technology testing
eXpress badging® Card Technology Test Form for documenting ID badge reader-system testing and approval

Production Print Preview (P3)

Objective: Verify the complete production population and approve its visible data before physical badge printing.

  • Confirm that a P3 is included or required in the approved project specifications.
  • Review the complete P3 at a readable magnification.
  • Verify every required record, photograph, visible data value, badge assignment, front-and-back pairing, quantity, and production order.
  • Submit all corrections in one consolidated list and review the revised P3.
  • Assign at least two qualified reviewers and obtain approval from an authorized representative.

Critical warning: P3 approval authorizes production; visible approved errors and incorrect customer-approved information require reprinting at the customer’s expense.

EBS Knowledge Base—Learn More: Production Print Preview (P3): Review and Approval
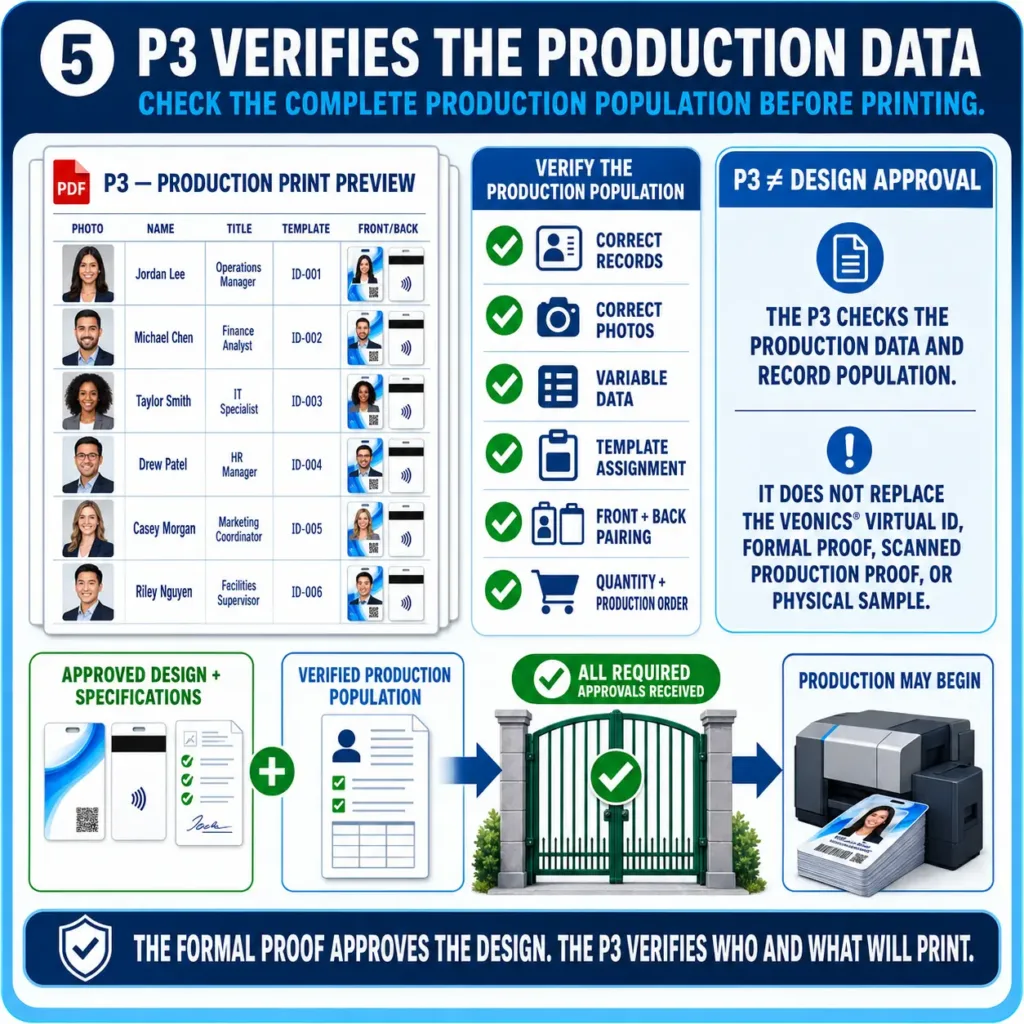
P3 Production Print Preview checking badge records, photos, variable data, template assignments, front and back pairing, quantity, and production order before printing.

FILE to PRINT (F2P): Printing from Individual Badge Images

Objective: Confirm that each customer-created file or page is ready and approved for direct printing.

  • Confirm workflow acceptance and required first-project preparation.
  • Prefer a single ordered multipage PDF, or provide a labeled PDF, JPG, or PNG per badge side.
  • For duplex jobs, sequence each badge front immediately before its corresponding back.
  • Prepare raster artwork in RGB at a minimum of 600 DPI and approved dimensions.
  • Verify bleed, orientation, slot clearance, readability, content accuracy, pairing, filenames, and production order.
  • Submit securely with complete instructions; approve the formal proof and any required P3.

Critical warning: Production prints files and pages as submitted without proofreading, correcting, or rebuilding them; customer-approved errors require paid reprinting.

EBS Knowledge Base—Learn More: File-to-Print ID Badges: Preparing Individual Badge Images for Production
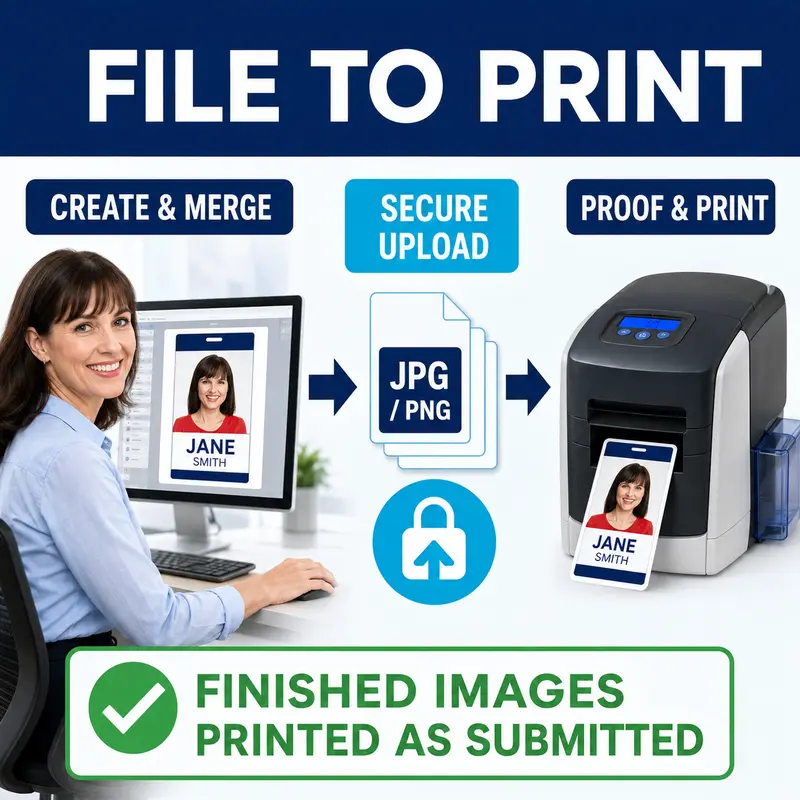
File-to-Print workflow showing a badge manager creating finished PDF or JPG or PNG badge images, securely uploading them, and printing the approved images.

DURAbadge™ Warranty

Objective: Confirm and approve the required DURAbadge™ construction, laminated sides, and warranty expectations before production.

  • Confirm whether the project requires the eXpress badging® We Print DURAbadge™ format.
  • Specify required 60% PVC/40% PET composite card stock.
  • Identify each side requiring an approved 1-mil overlaminate.
  • Verify that fading, scratching, abrasion, and printed-surface-wear coverage applies only to laminated sides.
  • Review the two-year limited durability warranty beginning on the original ship date.
  • Approve the DURAbadge™ construction and laminated sides in the final production specifications.

Critical warning: Customer-produced or customer-laminated cards do not automatically receive DURAbadge™ status or warranty coverage.

EBS Knowledge Base—Learn More: DURAbadge™ Format: Lamination, Durability, and Two-Year Limited Warranty


DURAbadge™ laminated ID badge with a two-year durability warranty